Store Locator CSV Manager
If you own a business with multiple physical locations, you understand the importance of having a store locator on your website. It's a convenient tool that helps customers find your nearest store quickly and easily. However, managing multiple store locations can be challenging, especially when it comes to updating your store locator database. The use of CSV files has become a popular method of organizing large amounts of data. This tool allows you to update your store locator data in bulk, making it a more efficient process.
CSV stands for Comma Separated Values, which is simply a file format used for storing data. It is a plain text file that contains rows of data, with each row representing a record and each column representing a specific attribute of that record. CSV files can be easily opened and edited in various software applications like Excel, Google Sheets, or even Notepad.
In this blog post, we will discuss the benefits of using a store locator CSV manager in Locatoraid and how it can streamline your location management operations.
Template CSV File
As soon as you have at least one location in your Locatoraid store locator, you can download the CSV file representing the current database of your location management system. Go to Locatoraid, Export to download this file.

You will get a file named like export-2023-05-13_06-17.csv, with your current date and time.
Add, Edit and Delete Locations
Open your downloaded file with your preferred spreadshift software (Excel, LibreOffice Calc, Google Sheets or other).

To add a new location, just fill in a new row with the new location details.

To delete a location, simply delete its respective row of data.
Upload Updated CSV File
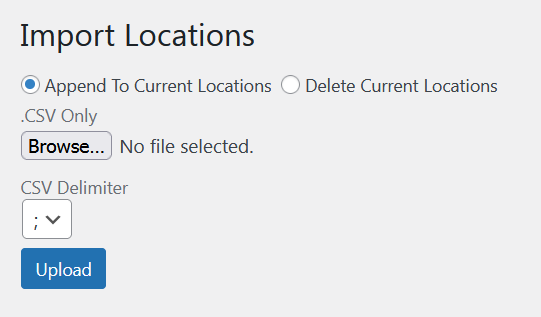
After you finish adding, editing or deleting your store locations in the CSV file, save it to a new name. Then you will need to upload it back to Locatoraid store locator plugin database. In your WordPress admin, go to Locatoraid, Import. You will get to the Import Locations form.

There are two modes of importing your locations from CSV file to the store locator database. You can Append To Current Locations which is useful when you add new locations in bulk.
Another option is Delete Current Locations. It can be handy if you prefer to edit and keep your location list in the file on your computer. So after you updated the file, you would like to commit the changes to your online store locator database. With this option the current locations in the online database will be deleted, and the entire database will be recreated again from the CSV file. Be careful with this option, it's only recommended when the CSV file on your computer is the core source of data.
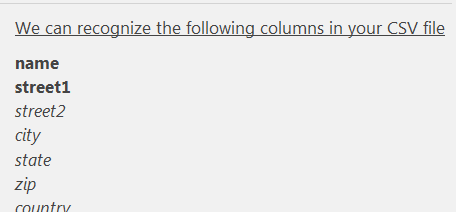
You can also select the CSV Delimiter option which depend on your computer's regional settings. For your convenience, the upload form also lists the names of data columns that it can recognize in your locations CSV file. The CSV file can also have additional columns related to Products and Custom Fields features of Locatoraid Pro.

After you uploaded the file, the new locations will be added to your online location management system.

So as we see this CSV manager is a great tool that can help manage store locations with ease. It allows for the importing and exporting of data in CSV format, making it easy to update and manage multiple locations at once.
About Locatoraid
Lightweight, easy to use WordPress store locator plugin to help your customers find your stores, dealers, hotels, restaurants, ATMs, products, or any other types of locations. Get started with the free Locatoraid version and enjoy the beautiful add-ons of Locatoraid Pro.